
HI!!! Meet cha again!
In here i will show you “how to create your own soc med button on
your blog”. But, maybe it's little bit complicated, but don't dizzy guys, i post it as easy as i can.

OK let’s get start!
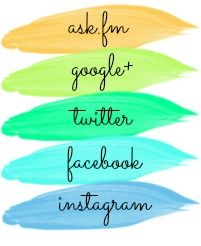
first, u must design or download the picture that u’ll use (201 px x 246 px). If u get the picture rather than that pixel, you can crop it into those pixel.
second, open your image in Picmonkey.
third, go to the overlays tab, and begin adding simple rectangular divider
lines. Add one to separate each social media outlet you want to use. u can use Facebook, Twitter, Bloglovin, Pinterest, Instagram and etc.

fourth, add ur text! Easy enough, right? Maybe even get wild and crazy and include hearts
or something. I'm not wild and crazy, so I'll just add the text. Then save your
image as a PNG.


sixth, Time to map your image. Visit this website here. Paste the URL you just copied from photobucket and click start
mapping your image. (start from here i use the lastest update, so the pic is different).

seventh, click right on ur mouse, and then "create rect". Pull
and drag your rectangle to fill the area you want clickable for that social
media icon. Then replace http://www.image-maps.com/ with your "account" link. Do the same with the other.
eighth, after that, click right and click "options". And then, change the "Base URL" with your blog adress.

nineth, if u've done, click right of ur mouse and then click "Get Code". after that, click HTML code.
tenth, copy the code that located most below of that dialogue.
eleventh,
*Almost finish guys, huft... launch your Bloger Dashbor => Layout => Add
Gadget => HTML/Javascript. And then, paste your code => save => save
arrangement.
TARAAA..... ur own social media link is ready...
hoaaammm..... :o getting sleepy
gnite all


0 comments:
Post a Comment